TimberSurf’s Model Railway
Modelling Tips, Links & Guides for Model Railways
Lumsdonia Railway

A web page for my indulgence and sharing ideas and irregular updates on my Model railway


SALE
PLUS
A guide to make your own brackets to hold a servo, to drive a point with two microswitches!
Homemade servo bracket How To
Point Servo Bracket
I need about 40 points. If you only have one or two points, motorising them with any of the off the shelf solutions is sensible.They range from £6 (Seep) to £25 (DCC Concepts) each. If you use electrofrog points, you either need an integral switch or need to affix an additional one, else a frog juicer will be required as well.
For larger layouts, the cost soon mounts up, so I needed to investigate a cheaper option. The solution takes the form of a cheap RC (Radio Control) Servo <£2) and some electronics to drive it.
My research lead me to Megapoints controller, probably the cheapest option off the shelf. I have since discovered and programmed Arduino’s, one can control up to 6 servos for just a few pounds, but would need to be developed as a shield (PCB) for inputs and adjustment. The other issue with servo's is that they have no contacts for signals and frogs.
I have made a bracket to solve that problem. There are alternatives that have brackets with space for microswitches, see my POINTS guide, or you could use frog juicers, but it all starts mounting up in cost.
The other option is to join MERG and buy theirs.
The other angle is what you control them with, switches locally or some sort of coms, DCC would need a tablet or PC, Megapoints has a built in canbus system (and they sell the hardware), Arduino has about 6 different coms options, but you would have to "build" it yourself, else you will have lots of wires to run to a mimic.
(Model Electronic Railway Group) is an international, UK based group promoting interest in the application of electronics & computers to all aspects of Model Railways
For non electrofrog points, a microswitch is not needed, the second microswitch can be used to give feedback to a mimic panel or via DCC into a feedback module or direct to an associated electronically driven signal.
After a lot of research, I found some right angle aluminium bar that is just the right size, some "off the shelf" brass spacers to offset the servo from the face and the design is done! A Servo, two microswitches, piano wire, 2 types of screws and the aluminium will total £1.89 per point!
So £2.50 for Megapoint and £1.89 for parts (+20p for aservo harness) = about £4.60 per point!
Supply list
9G RC Servo
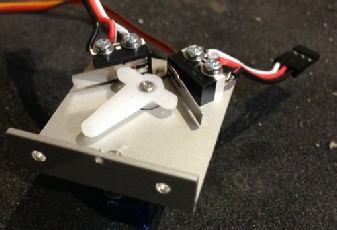
Aluminium extrusion was cut from a meter length of 40mm x 10mm, available only at larger B and Q stores. As you can see from pictures, I had to pack up the height with wood, to get the right throw, but that is because my boards are only 6mm ply, should be fine on 9mm+ thick boards.
Brass spacers were obtained on Ebay (long lead time from China), search for "M2 Tapped Brass Stand-Off Pillar", I got 8mm, but had to add washers, so perhaps 9mm might be better.
Screws M2 x 5mm (countersunk and pan head)
Screws M2 x 10mm and M2 Nuts (for microSW)
M2 washers
Ultra Mini Microswitch SPDT Sub Miniature Micro Switch long lever (18mm)
Spring steel wire 0.8mm (or 0.6mm) or stainless steel wire
Washers are needed with the mounting screws, so the holes can be oversize and allow final positioning.
Final adjustment of the micro's was finicky, so although self tapers would do, the holes would need to deadly accurate. I ended up elongating/widening the holes to give the right position, hole size does not stop them being clamped in the right position.
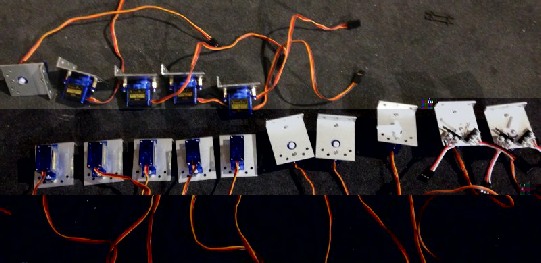
The production line
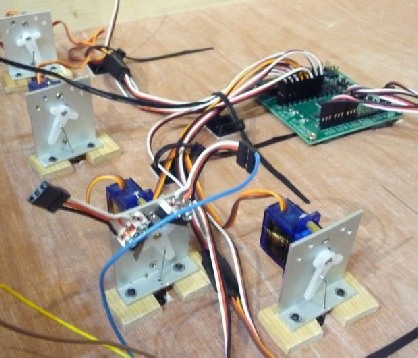
Installed (upside down view) with Megapoint controller
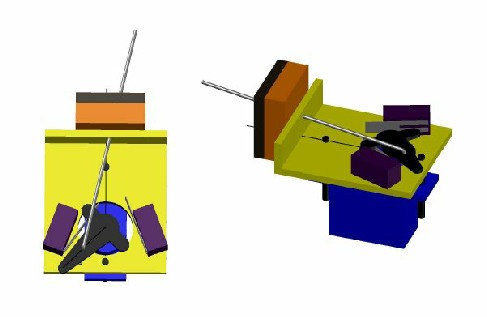
CAD design, showing lever in down position, gives too much throw (may be OK for larger scales but not for my OO)